RWCEG Steering Committee Meeting--Tuesday, Oct.1st @6:30 pm
Come to the garden and join in on the planting and tending of the Fall season! We would love to see some new faces in the garden and are happy to work with your schedule and availability, even a commitment of a half hour for watering once a week is appreciated. It's a great way to unwind from the work/ school day and connect with nature and your family.
Can't make it to the meeting but want to get involved? Just send an email to roni@verokolt.com and we'll get you in to the mix.

Growing Good in the Hood!
Monday, September 30, 2013
Tuesday, September 10, 2013
Tues. Sept 17th-Opportunity to help design sustainable garden beds and learn about soil
We had a great turn out at the wicking bed workshop last weekend and eagerly began emptying out the tallest garden bed to install our wicking system (click on link to learn more)


while shoveling out soil, we noticed the perimeter wood frame we installed three years ago was rotting and the structure, without the soil, had become very rickety.

We had been told by our garden consultants at the time of initial construction that the Douglas Fir wood planks we used would eventually rot over time and need to be replaced...so we thought we would take this opportunity to look at OTHER types of raised bed construction that would be ECO, ECONOMICAL, BEAUTIFUL and SUSTAINABLE! Some of the suggestions were cinder block, stone masonry and recycled plastic wood plank decking as perimeter building materials. Our plan is to do some research this week and meet back at the garden next TUESDAY, Sept. 17th at 7pm to present options, brainstorm and come up with a SUSTAINABLE SOLUTION. We welcome ALL to come and join the brain trust.
In addition, we will have a guest speaker, Patrick of Microbial Earth Farm, who will talk to us about soil testing and food forests!
Hope you can stop by for the "constructive" fun!
Saturday, September 7, 2013
The Dirt on Texas Grub Worms
Background: During
a garden community gathering on Saturday morning, September 7th,
several members were involved in shoveling out all the soil from Garden Bed 1
as the first phase to install an experimental water wicking system. During this
effort, a large “grub worm” was discovered deep in the north-west corner of the
bed. Out of concern for the worm and future plants, my son, Evan, removed the
worm and transplanted it outside the garden (near the chimney swift habitat
across the park). See below for images
of the grub worm.

Evan holding a Grub Worm found at RWCEG

Close up of the Grub Worm
Identification: As
the so-called “garden entomologist”, I was asked to identify the worm and
determine if they are a potential threat to the garden. Per my research to
date, I believe the grub worm to be the larvae stage of a scarab class
beetle commonly known as the May Beetle or June Bug (most common is Phyllophaga crinit). I base this on positive image identification
from several websites. Furthermore, back in June, Evan and I discovered a few adult June Bug beetles caught and
strangled in the bird netting that covered that garden bed at the time. Below
is a picture of one such tangled beetle in the netting. Also included is a clear
picture of a June Bug beetle.

June Bug beetle found caught in netting at RWCEG back in June.
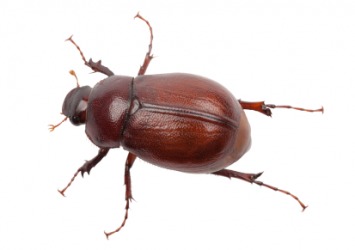
June Bug (Scarab) Beetle
Are they harmful? Unfortunately, grub worms can be harmful to
lawns and gardens. They eat the roots of grass and vegetable plants (up to 200
times their body weight!). They have been known to destroy lawns if there is a
large number of them. However, since the grubs cannot bite or sting, they are benign to
people. Since we only found one grub in the garden bed, I doubt it would have
been a serious threat, but it is good it was removed. Since the other garden beds have had all or
most plants removed, it would probably be a good idea to sift through the soil
of these beds to clear them out if found.
Organic Control:
Further Information: As gross as it may seem to many of us, several cultures eat Grub Worms indigenous to their areas. For those interested in knowing more details about the life cycle of these creatures and control methods, I encourage you to check out the following websites:
- Glenn & Evan Starnes
Wednesday, September 4, 2013
Evan's Garden Pet, Big Green
Here is a funny story regarding the psychology of a ten-year old boy with respect to bugs. The other day I found a few tomato hornworm caterpillars eating our tomato plants in the backyard. I informed my son Evan, and he became very upset. He had recently been looking at blown-up pictures of these creatures and thus had an inflated image in his mind as to how large and destructive they are. Furthermore, he kept crying that they were "going to pop out at him and 'stink' him". I think he said this because Mel Bartholomew (author of "Square Foot Gardening") mentioned they can have a foul smelling musk. After pleading with me to help, we went out together to rid our garden of these insidious creatures that had all but destroyed a few tomato plants. However, once Evan finally got a close look at them, he decided they weren't the terrible giant stink monsters he had feared, but rather, he thought they were "kind of cute"! Anyway, to make a long story short, Evan now has a couple of "hornworm pets". He is feeding them the rest of his tomato plant in a sealed container and hopes to see them mature into Hawk Moths. As Evan points out, Hawk Moths are good pollinators. We are keeping an eye for these guys at RWCEG because a single worm can eat an entire tomato plant! Below is a picture of his new pet, "Big Green".
- originally written by Glenn Starnes on June 22, 2013

"Big Green"
The Hawk Moth Arrives!
As some may recall, I related an amusing story a month ago about my son Evan choosing to make what was a garden pest into a pet. Evan had intentions of destroying a few tobacco hornworm caterpillars (Manduca sexta) that were eating his tomato plants until he realized how "cute" they were. We started with 3 or 4, but only one made it to maturity and started to pupate about 3 weeks ago. To our surprise, this species does not build a chrysalis or cocoon from a hanging branch, but rather, burrows itself a few inches under soil. This past Friday, Evan's hornworm pet, Big Green, emerged as a large moth. The moth species is Manduca sexta, but is commonly called the hawk moth, hummingbird moth, or the orange spotted sphinx moth.
-Glenn & Evan originally written July 19, 2013


Tuesday, September 3, 2013
Wicking bed garden project-Sat. Sept.7th 9am
Now that it's officially "Fall", with Labor Day over, kids back in school and nothin' but 100 degree temps in sight, I humbly invite you back to the garden this Saturday, Sept.7th at 9am to transform one of the raised beds to a WICKING BED. What's a wicking bed, you might ask? Well as of two weeks ago, I had no idea either, until I went to a Transfarming meet-up at my new friend Arturo's house, where he lead a class on aquaponics and introduced us to all sorts of alternative growing methods, one of which, was wicking beds.
A wicking bed is essentially a raised bed that is extremely efficient at keeping it's plants hydrated and holding in vital nutrients in the soil which otherwise get washed away. I have noticed over the past 3 years (yes, it's really been three years!) of intense gardening in our 3- 4'x12' beds, that no matter how much we "love" our soil in the form of composting, fertilizing and planting nitrogen-rich cover crops--the beds are just plain tired and the production and yield of vegetables and fruits is way down.
So I'm thinking we try an experiment and remove all the old, tired soil out of one of the beds, install a waterproof bed liner and PVC subterranean watering system and fill it in with fresh loads of compost and soil and see what happens this fall. I know at minimum, we'll be saving a ton of water and hopefully seeing a major uptick on the fall crop production. Hope you can bring a shovel and join me Saturday on another adventure in the great garden experiment!
 |
| This is a wicking bed. Notice the PVC pipe that creates a subterranean watering system. Arturo says he waters ONCE EVERY 3 WEEKS!!!! Compare this front bed to the one in the back that is a standard raised bed. |
 |
| This is Arturo's super cool greenhouse aquaponics set up. I plan on trying this at home! |
Subscribe to:
Posts (Atom)